How to change the wiring in an apartment. How to replace electrical wiring in an apartment - step-by-step instructions. New wiring diagram
Very often, the need to replace wiring arises in those houses that were built in the last century.
These are Brezhnevka, Khrushchev and other buildings. During the construction of these buildings, a different calculation of the load on electrical wiring was made. During this period there was no wide variety of household appliances, which cannot be said about modern times.
Step-by-step wiring replacement
If you need to replace the wiring, then an estimate of the expected scope of work is made.
In this case, it is necessary to clarify whether the wiring will be completely or partially replaced. The second option for replacing electrical wiring is used less rarely. This is explained by the fact that Khrushchev or panel houses need to be completely replaced.
Previously, electrical wiring was installed using aluminum cables that had a small cross-section.
Very often the wiring was characterized by a lack of grounding. The danger lies in operating electrical wiring at high mains voltage.
Today, wiring can be replaced using copper wire, junction boxes and sockets that are grounded. In this case, innovative materials are used.
That is why, when deciding to change the electrical network in your home, you need to think about the level of security and completely replace it.
If you do not have relevant experience in the field of replacing the electrical network, you can turn to professionals for help, one of which is the company Elektromontazh Kazan+. It employs highly qualified specialists who thoroughly know the features of replacing electrical wiring, which ensures excellent quality of the procedure. Thanks to the availability of special equipment, the work is carried out as quickly as possible.

You must make your own decisions about who will carry out the wiring replacement: you do it yourself or experienced professionals.
Carrying out electrical installation work yourself is not so difficult, but it requires not only the use of a special tool, but also the availability of appropriate knowledge to carry out calculations and the work itself.
Preparatory stage
In order to change the wiring, you need to draw up a project.
In this case, it is necessary to draw up a diagram for laying a new electrical network. During this period, it is necessary to determine where switches, sockets, distribution boxes will be located, and where powerful household appliances will be connected. The diagram must necessarily include the location of the washing machine, dishwasher, water heater, electric stove, etc. Specialists of the Elektromontazh Kazan+ company are ready to draw up a circuit at a high level of quality.
Using the diagram, materials are selected that will fully meet the requirements of a particular home.
If you decide to do the project yourself, then you need to decide where the distribution boxes will be located. After completing renovation work in the house, it is necessary to place sockets and switches in the safest and most convenient places.
When choosing materials for installing an electrical box, it is strongly recommended to follow the advice of specialists.
Carrying out wiring replacement
Before removing old electrical wiring from the facility, it is necessary to de-energize the apartment. In this case, a test must be carried out using a multimeter.
It is necessary to move electrical appliances and furniture away from the walls, and also dismantle sockets and switches.
Very often, a wire can be found in the wall using a metal detector. To dismantle electrical wiring in a panel house, very often you just need to pull out the cable from the junction boxes. But very often it happens that dismantling leads to the destruction of the wall.
In this case, it is necessary to use the gating method.
This method consists of cutting off a complex area and completely isolating it.
After removing the old wiring, it is necessary to prepare the walls for laying new cables.
For this purpose, it is necessary to make recesses for the wiring and mark the locations of switches and sockets.
Depending on the condition of the wall, you can lay new cables in the old channels. To obtain even grooves, you must first mark their location. You need to draw two even parallel lines at a distance of two centimeters.
You need to go over them with a grinder, making four-centimeter indentations. Next, use a hammer or chisel to remove the middle. You can also use a hammer drill for this purpose.
The next step is to install the distribution boxes and secure them. The boxes are fixed using cement mortar. The cable is laid between the switchboard and distribution boxes.
To connect the wires to each other, you must use terminals.
In this case, it is necessary to ensure that the ends of the cable in the phase do not get mixed up. All twists are placed in distribution boxes.
To properly connect the cables to each other, strip them at the ends by 3-4 centimeters. Next, their ends are twisted and trimmed to 1 centimeter in length. A terminal or special tape can be used for insulation. Next, the cable is routed through the recess to sockets and switches.
After laying the cable, you need to take a photo, which will greatly simplify the search for wiring in the event of a power failure.
To install wiring into the electrical panel, the cables are routed into separate lines.
Each of them is characterized by the presence of its own switch. This action must be performed if there are powerful household appliances in the apartment, which is explained by the future operation of the high voltage power line. By distributing the lines, the electrical wiring repair process is greatly simplified.
Specialists of the Elektromontazh Kazan+ company produce additional insulation of cables using conventional or corrugated pipes, which are laid in grooves.
With this wiring installation, during repairs there will be no need to groove the walls.
After the electrical network has been tested by testing the wiring with a multimeter, the grooves are lubricated with a solution. If there are no defects in the wiring, then it is connected to the electrical panel. During this period, it is necessary to check how sockets and switches work.

At the next stage, the home is de-energized and all recesses are covered.
After the cement mortar has dried thoroughly, sockets, switches, and lamps are connected.
Specialists of the Elektromontazh Kazan+ company are ready to carry out the above procedure as quickly as possible at an affordable cost.
Watch the video:
How to replace wiring?
Many older apartments require wiring to be replaced due to various problems. This action can be performed in several stages.
Making a plan
In order to replace the wiring correctly, you must first draw up a plan. It must take into account the locations of sockets and switches.
Also at this stage, you need to determine where the distribution boxes, lighting sources, electrical appliances, electrical panel, and wires will be located.
Modern apartments are characterized by the presence of one cable for a certain group of consumers. That is why during a breakdown of electrical wiring, a certain zone is switched off. If it is necessary to replace the wiring in the bathroom, then the location of the RCD is provided.
This is due to the increased humidity in the room.
Features of the work
Before replacing the wiring in the apartment, you need to prepare all the tools. The apartment must be completely de-energized. In order to ensure the operation of the electrical appliances necessary for installation, a temporary shed is set up. This is a socket whose power is supplied from an external meter using an extension cord.
Before installation, the old wiring must be removed.
Work begins from the distribution box.
Replacing electrical wiring in an apartment: video lesson on how to change wiring in an apartment in a panel house
The main wire is cut or insulated. The same manipulations are carried out with the rest of the wiring. At the next stage, the process of gating the walls is carried out. The user must remember that wiring can only be installed in a vertical or horizontal position. After laying the wiring in the grooves, installation of sockets, switches and lighting fixtures is carried out.
After connecting the wiring in accordance with the plan, it is necessary to check its functionality. If everything is in order, then electric current is supplied to the apartment.
The Elektromontazh Kazan+ company provides its services for replacing electrical wiring.
The company's experienced employees are ready to complete electrical installation work as quickly as possible, regardless of the level of complexity of the plan. The company provides quality guarantees for the work performed, which allows the client to be confident in the performance of the system. The material for replacing the wiring can also be produced by the company at a discount.
Thanks for your application!
We will contact you shortly
A few simple steps from ordering to ready-made plans at your site
YOU LEAVE A REQUEST IN A WAY CONVENIENT FOR YOU
(by phone or through the website).
2. INVESTIGATION OF THE OBJECT
OUR SPECIALIST WILL COME TO YOU FOR A CONSULTATION AND INSPECTION OF THE OBJECT.
3. EXECUTION
COMPLETION OF WORK IN THE SHORTEST TIME
4. RESULT
YOU ARE SATISFIED WITH THE SERVICE AND QUALITY OF WORK
Our motto:
We provide discounts on electrical materials from 10 to 25%.

Hello, my name is Ramil,
I am a consultant for the company ELEKTROMONTAZH KAZAN+!
CALL US OR SIGN UP FOR A CONSULTATION!
*We care about your privacy!
Your data will NOT be transferred to third parties!

One of the most important conditions in which a person lives is the availability of electricity. In its absence, it becomes impossible to lead a comfortable and enjoyable life. However, there are times when, for one reason or another, electric current stops feeding.
The consequence of this can be many factors: a short circuit, an accident at a power plant, a broken wire on the street. However, sometimes the reason may lie in the wiring.
How is wiring replaced without gating?
There are cases when closed wiring cannot be changed without gating.
For example, the very definition of a closed visualization method contains the idea of making channels hidden from view through which wires pass. So it is impossible to get to them without opening or chipping.
However, for open wiring methods such an outcome is possible. Regardless of the type of wiring you are installing, you always need to make a plan first.
It is difficult to do anything without seeing a clear wire layout. This is especially important after the installation is completed, when in the future you will need to return to this topic and not open all the walls.
Important: do not forget to measure the voltage insulation before applying current.
It is advisable to also show on the diagram all sockets, switches, and distribution boxes.
It is advisable that if you have already decided to take on this important matter, then, if possible, change the wiring in the entire apartment so that there are no unpleasant surprises with its breakdown in the future.
Replacing wiring in an apartment using old channels without gating
In order to use this method of replacing wiring, you need to have a new cable that will be pulled in place of the old one.
How to make electrical wiring in an apartment with your own hands
To help, be sure to purchase a steel broach.
The first step is to remove the socket and use a steel wire to stretch the wire to it.
Connect the terminals well. Although this is a simple way to replace wiring, it requires special equipment with which you can track the movement of current.
Based on the above, it is quite possible to replace the wiring in a Khrushchev-era building without gating with your own hands, without resorting to the help of professionals.
Remember that when working with electricity, you must always be extremely careful and do not forget to turn off the current supply during installation work.
Connect the terminals to each other carefully and correctly to avoid the possibility of short circuits.
See below for a useful video on how to replace part of the wiring without gating.
We hope that the article was useful to you. We will be grateful if you share it on social networks.
MASTER 2014-12-02 17:03:50
Partial replacement of electrical wiring is due more to necessity than desire. The main reason for this option of updating the wiring may be a simple lack of funds for a full-fledged complete replacement.
But even if you start small, you will definitely take the right step towards the normal operation and safety of your wiring.
Partial replacement of electrical wiring
This method of replacing wiring has its place, but there are also disadvantages to such a replacement. By choosing the step-by-step method and installing new wires in a specific room, you will be faced with the need to power new outlets and lights from the existing old distribution box.
The problem may also be that due to a lack of free space or the presence of a large number of old connections in the box, all this will require reconnection of old, fragile wires. The ideal solution in this case would be to power the room not through the distribution box, but by connecting directly to the circuit breaker on the distribution panel. True, the sight of wires lying around the apartment is not entirely pleasant, but it may well be a temporary option for this solution.
You have identified the room in which the wiring will be changed and, where there may be a fairly high load in the sockets, or maybe there are still potentially loaded sockets in the house, then it is also advisable to make a separate wire in them and new group sockets
If you are planning to install an air conditioner or heated floor, then for this increased load you will need to draw a separate line from the electrical panel and place it on a separate toggle switch.
Do-it-yourself replacement of wiring in an apartment
And in general, if in the future you have plans to purchase and install electrical equipment that requires increased loads, it is advisable for each device to have a separate socket and a separate switch.
It is also advisable to inspect all connections of old wiring in distribution boxes. If there are charred ones, then they must be cleaned, twisted and reliably insulated.
Of course, it is better to opt for simultaneous replacement of the wiring in the entire apartment, but, sadly, our desires do not always keep pace with our capabilities, and we have to choose a phased repair and not only the wiring.
Direction to the apartment with your own hands
Directing your home from a shield with your own hands is a multi-step process that requires special attention and skills to implement, but it is easy to implement if you follow clear recommendations from experts.
The need to replace the electrical network may arise for a number of reasons, including:
Of course, wiring in the apartment is simply done using special services, but this is uneconomical. Many companies buy goods at more high price, which significantly increases the final cost of the work, and the rapid growth in the number of enterprises operating in this area makes it difficult to find a qualified specialist. Almost every property owner immediately asks the question “how to install wiring into a home by hand.”
Receipt
Installing electricians in an apartment with your own hands is real and doable.
You will need:
- insulated pliers, pliers;
- power indicators;
- alabaster;
- sockets;
- switches;
- distribution and installation boxes;
- ribbon;
- lighting elements.
For a good example, you can see a photo of the electrical wiring in the apartment with your own hands.
Design and design
Electrical installation in an apartment with your own hands is carried out in open, hidden and combined modes.
The concealed type is used to install overhead lines above suspended ceilings, in empty spaces and partitions between building shell elements and hardened pipes.
The open method involves laying wires on walls, knitted fabrics and plastic channels. If necessary, it is possible to organize a mixed type of transmission. Photo wiring in the apartment will help you choose the path in accordance with your wishes and needs.
Electrical installation in new apartment DIY requires an accurate calculation of the electric highway.
The selection of cables and wires must take into account their cross-section and material. Copper wires can hold a higher load than aluminum.
Replacing old wiring in the house
The minimum power of all equipment installed in the apartment is calculated. The power of each device is indicated in the passport. When installing electricians in an apartment with their own hands, they must calculate the length of the wires. This parameter depends on the number of installation points in the network. All types of changeover switches and distribution boxes require at least ten centimeters of surface area per element.
Electrical installation in an apartment with your own hands requires performing such an important task as developing its circuit in accordance with the layout.
At this stage, you should know where the switches, switchboards are located, where high-voltage electrical appliances and lighting devices will be installed.
To solve this problem, you can use a photo of the electrical circuit in the apartment before repairing.
Installing wiring in a beam house is generally similar to installing electrical wiring in an apartment, but it still has many features. With Beam Building Electrical Technology you can find here.
To connect the switch, read here.
Laying electrical wires
How to install electricians quickly and efficiently? At the first stage, measures are taken to prepare the holes for the wire. Complete all parts for switches and connectors as cables are made by shtroby. To learn this step, you will need to get a curtain cutter and an electric drill.
Do-it-yourself wiring in the apartment in accordance with the standard regulates all stages of cable management.
First, the path is established for the main set of ropes. All rooms parallel to the ground are located at a distance of twenty centimeters from the ceiling. The rotation should be 90 degrees.
Installing wiring in an apartment with your own hands makes it easy to place labels on the walls with a string.
Photoelectrics in the apartment clearly indicate that the switch should be installed on the side of the handle on the door, making sure that it will not be damaged when opened.
Place commas in the escapement areas of the caps.
When installing mixers, the height should be between eighty and fifty inches, but when installing jacks, the level of height depends entirely on your own considerations.
To ensure high-quality wiring of connectors in an apartment with your own hands, you must follow certain rules.
It is best to install a triple socket in the kitchen. Power cord outlets cannot be installed in areas where gas and electric stoves, washbasins and water pipes are located nearby.
To ensure safety in areas with high humidity, installation in residential areas requires the installation of switches and connectors protected by an RCD - the device stops supplying electric current if there is a leak or a significant power failure.
The distance from the sink and bathtub should be at least two and a half meters.
Installing electrical wiring in an apartment with your own hands using these recommendations negatively affects the risk of short circuits and protecting your premises from fire.
Replacing electrical wiring is one of the very first and most important stages overhaul apartments.
Sometimes it is the need to replace outdated wiring that becomes the main argument in favor of radical changes in the appearance of the living space.
In this article we will look in detail at how to replace electrical wiring in an apartment with your own hands.
In houses and old apartments built more than 20 years ago, where old-style wiring that is morally and physically obsolete is still preserved, it is necessary to replace the electrical wiring. In the last century, to organize internal electrical networks aluminum wires were used.
Aluminum is highly susceptible to corrosion; in addition, during operation, the structure of the metal undergoes irreversible changes, the network becomes very fragile. Deterioration of insulation increases the risk of fires due to short circuits.
Among typical problems old wiring should be mentioned:
- Solidly grounded neutrals instead of the currently accepted protective grounding;
- Wiring by branching method;
- Lack of automatic protective shutdown devices;
- Too few sockets.
In addition, the load on internal electrical networks for 15-20 recent years increased significantly compared to the design values. Combined with the technical imperfections of older networks, this poses a serious risk of accident with possible fire.
- the house was built more than 20 years ago,
- sockets spark in the apartment,
- sockets fail
- When you turn on electrical appliances, you smell the smell of burning insulation,
- wires break easily,
- current leaks through the walls,
then the wiring needs to be changed urgently. And the more signs of wear and tear, the less time you have to think..
How to competently replace old electrical wiring in an apartment with your own hands, see further in the video review:
Sequence of actions
Let's try to figure out in detail how to properly replace the wiring in an apartment with your own hands. Step-by-step do-it-yourself replacement of electrical wiring in an apartment:
- internal circuits.
- Drawing up a wiring plan.
- Approval and registration of the plan and diagram with the energy inspectorate.
- Temporary structure.
- Wiring installation.
- Installation of protective mechanisms and connection points.
Then you need to turn off the power and route the wires across the terminal blocks. Afterwards, it is necessary to carry out another check for short circuits with the circuit breakers turned off and then with the circuit breakers turned on, after which you can connect the main circuit breaker.
Safety regulations
All work is performed with tools with insulated handles and wearing rubberized gloves.. To tap walls at height, it is best to use a sawhorse or a stepladder with a horizontal stop. An ordinary stepladder is not reliable enough.
Replacing electrical wiring with your own hands is a rather complicated task, but doable, if you know how to draw up and read electrical diagrams. Otherwise, it’s better not to take risks and contact professional electricians.
In conclusion, we suggest watching a video review on how to choose the right material and do the wiring yourself:
It would be irrational to replace old wiring without accompanying major repairs, especially if we are talking about its hidden type. These are large expenses for materials, payment for electricians and repairmen. However, you can save a lot of money on paying someone else's labor. To do this, you need minimal knowledge of electrics and a lot of free time. You will find the time, and we will tell you how to change the electrical wiring yourself.
All work on replacing electrical wiring must be performed one after another, without changing the sequence. Otherwise, you may end up buying too little or too much material, making the wrong cable connection, or running the wire in the wrong place. To prevent this from happening, perform the work in the following order:
- Determining the scope of work;
- Drawing up a diagram;
- Calculation and purchase of materials, preparation of tools;
- Dismantling or cutting old wiring;
- Marking new wiring;
- Installation of new wiring;
- Control check.
If the wiring check was successful, then the overhaul can be completed. However, it has nothing to do with replacing the old wire.
When is it time to change the wiring? And what part of it?
Depending on the scale of work, wiring replacement can be:
- Partial;
- Full.
Partial replacement is justified in cases where:
- Only one line of non-old wiring was damaged mechanically or by fire;
- The load on one or more lines has increased significantly, and the wire cannot withstand it, while the distribution panel and the rest of the wiring are still suitable for use;
- There is not much time left before the planned overhaul, and the wiring needs fixing right now. This only applies to old wiring if at the moment the start of repairs is impossible, and you need to wait.
Signs indicating the need to completely replace the old electrical wiring:
The wiring in Khrushchev especially needs replacing. This apartment has been in use for more than 50 years. In the last century, all wiring was made of aluminum wire, not protected by corrugation. But at that time it was enough: how much do a lamp, a stove and a TV need? Today they have added washing machines and dishwashers, microwave ovens, vacuum cleaners, kettles and other household appliances. Therefore, in Khrushchev buildings with old wiring, a fire is created dangerous situation and constantly knocks out traffic jams.
Wiring diagram
Before you change the wiring in your apartment with your own hands, you need to draw up a diagram of a new one. And it does not have to coincide with the old one, which often contradicts fire safety requirements.
The diagram is drawn up arbitrarily using symbols. You will need to recognize the markings for outlets, switches, junction boxes, and junction boxes. You come up with the designations for them yourself. But mark the route along which the wire will be laid with a line. Moreover, for each wire (zero, phase, ground), come up with your own color.
It might go something like this.

The imagination that you can use when drawing up a new electrical wiring diagram is limited by the following rules:
- Do not connect grounding socket contacts to water supply and heating pipes or to a common wire. For this purpose, a grounding cable must be provided;
- The electrical wiring route is laid only vertically or horizontally, angles of only 90 degrees are allowed;
- The wires should not intersect, and at least 0.3 cm should be left between them;
- The distance from the route to the floor/ceiling should not be less than 15 cm, and between it and the door/window opening - 10 cm;
- Switches on the outside or inside of the room, but always on the handle side.
- Switches and sockets are placed in a row at the same level;
- Old standard: installation of sockets at a height of 0.8-0.9 m, and switches - 1.5 m. New standard: everything at a level of 0.8-0.9 m, but in the kitchen there must be a set with a distance of 10 cm from the tabletop. Sockets are allowed at a distance of 15 cm from the floor;
- For a room, there is 1 socket for every 6 squares. For the kitchen - 1 socket for every 2 squares;
- In adjacent rooms, place sockets and switches opposite each other.
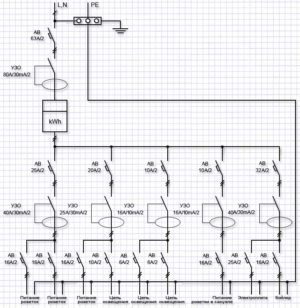
The rules for drawing up the diagram are clearly presented in the figure below.

Devices and materials
According to the diagram you will see what materials and in what quantity you will need them. But buy 20% more. This way you will protect yourself from inaccurate calculations and possible damage to materials during work.
You will need:
- Distribution panel – 1;
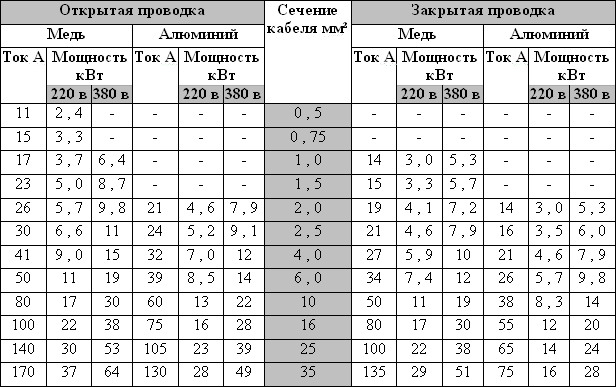
- Cable. For complete replacement of any wiring - copper. For partial replacement of copper wires - also copper, and for partial replacement of aluminum wiring - aluminum. In most cases, copper with a cross section of 2.5 square meters is chosen. mm for sockets, 4 sq. mm for the stove and 1.5 sq. mm for lamps. The optimal conductor cross-section can be selected using the table below the list;
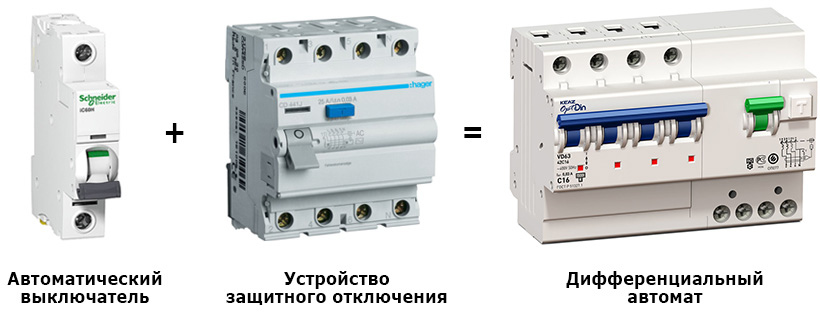
- Protective automation(residual current device and circuit breaker) to prevent overload, electrical leakage and short circuit. You can buy a “2 in 1” device: a differential machine. For the lighting line, the automation is taken at 16A, for socket families - at 25A, and for powerful consumers - 32A. The input RCD should operate at 62A, and the circuit breaker – at 50A. For each line - an RCD and a switch, or just a circuit breaker;
- Distribution boxes(round ones are easy to install, but square ones accommodate more connections). Their number corresponds to the number of wiring branches;
- Sockets. Preferably with grounding, and for the bathroom - with an RCD;
- Switches;
- Terminals for connecting cables.

Additionally, you may need corrugation (for hidden wiring) or cable channels (for open wiring).
For electrical installation work you need the following tools:
- Hammer or drill with three operating modes;
- Various hammer drill attachments;
- Grinder or wall chaser (optional, as you can use a hammer drill for this);
- Standard electrician's kit (nippers, pliers, scissors, electrical tape, screwdrivers, hacksaw and knife);
- Multimeter with dialing function.
These are tools for hidden type electrical wiring. For the open type, you will need another long wire about 1.5 mm thick. With its help it is convenient to pull the cable through the channel.
Getting rid of old wiring
Attention! From this stage, all work is carried out after the entire apartment has been de-energized!
New wiring in the apartment is installed with your own hands only after removing the old one. To do this:
- Look around the walls for old wire routes. Since cable installation starts from the distribution boxes, you need to find plastic covers or protrusions under the wallpaper in the walls. The cover needs to be removed. In the case of open wiring, the search is simple;
- Disconnect the cables in the junction boxes;
- Pull the wires out of the grooves.
Sometimes dismantling old electrical wiring requires serious damage to the walls or floor if it ran under the floor covering. In this case, it is possible to maintain the finish, but then the wires are cut and their ends are carefully insulated. However, the markings of the new wiring should not coincide with the old circuit, otherwise you will have to destroy everything. This method is relevant when the floor has an expensive coating that lasts for decades. Then the new cable is laid along the wall.
How to make markup?
The marking is carried out according to the drawn up diagram using a ruler or tapping cord. It must be smooth and accurate: it is along it that grooves will subsequently be made or cable channels will be laid.

To make a line with a cord, you need to attach its free end to the starting point of the wire route and stretch it to the extreme point. In it, you need to pinch the cord with your finger, and with your free hand, pull it in the middle, and then quickly release it. It will hit the wall, leaving a clear line on it.
Installation of new wiring
Now directly about how to change the wiring in the apartment yourself. The new cable can be laid in two ways: openly and hidden. But regardless of the type of electrical wiring, the first step is to install a shield.
We install the distribution panel
In modern apartments there is a special place for the switchboard in the form of a niche, to which it fits power cable. Then all the trouble comes down to fixing the shield in it and installing circuit breakers and RCDs connected to the cable into it.
In Soviet apartments, the shield is mounted in a place that is chosen independently. It should be easy to access. Since the power cable is not connected to the apartment, it is necessary to drill the wall in the selected location to pull the cable through which it is connected to the access panel. For these purposes, only VVGng 5*6 is suitable.
Typically, the insides of the shield are arranged as follows:
- Below is the earth;
- Above – zero;
- Between them are machine guns.

The input cable must be cleaned and the blue wire connected to zero and the yellow wire to ground. The white wire is connected to the machine contact on top, where an additional jumper will be installed leading to the machine next door.
Cables VVGng 3*2.5 and 3*1.5 are connected according to the diagram: the phase conductor is to the lower circuit-breaker terminal, and the neutral to the ground is similar to the first wire. If you have provided for the installation of an RCD, then first the phase with zero is connected to it. They are connected to the terminals of the machine through a disconnect device.
We mount it hidden
Replacing the wiring in a panel house with your own hands is a simple matter. The panels already have grooves for wires. And you don’t need to ditch anything. In other apartments you will have to work hard:

Attention! The work of making grooves is very dusty. Therefore, you need to protect yourself with a respirator and special glasses.
We mount openly
Open wiring is rarely done in apartments, so it cannot be completely ruled out. And it is mandatory to do it in offices and other public places. It may not be very aesthetic. But it has an important advantage - the ability to work with it at any time, regardless of repairs, since dismantling does not require damage to the wall finish.
In the case of open wiring, everything is simpler: there is no need to make grooves. You just need to stretch the cable along the wall according to the markings. As for distribution boxes, everything is the same. Only they are not installed inside the wall, but are fixed on its surface.

If you want aesthetics, cable duct is for you. Today they are colored even to match natural wood. Then the cable must first be pulled through the channel, and then secured to the wall according to the markings.

Wiring check
After laying the cable, use a multimeter with a continuity function. Having called each cable and found no errors (the zero should not be connected to the phase and ground, the ground should not be connected to the zero and phase, and the phase to them) in the electrical wiring, you can begin checking the operation of sockets and switches. If everything works, it's time to seal the grooves. A putty mixture is suitable for this. When the composition dries, the walls can be finished with any material.
Improper electrical wiring has caused many fires and deaths. Therefore, before you replace the wiring in your apartment with your own hands, think carefully about whether you can handle it? If there is even the slightest doubt, entrust the matter to a specialist. Safety costs more than the cost of qualified assistance from an electrician.
One of the most common reasons for changing the electrical wiring in a private home is increased electricity consumption. It creates a strong load on the wires, which, as a rule, are not ready for this due to physical wear.
In addition, replacing the wiring allows you to achieve a higher level of electrical safety. In an old house, over years of use, the wire insulation may deteriorate. The result is a dangerous situation, which on top of that entails additional energy costs.
Replacing electrical wiring in a house with your own hands is a rather difficult task, especially if we are talking about hidden electrical wiring. However, this task is doable if a person is able to understand the diagrams. Otherwise, it is better not to tempt fate and contact either a good private electrician or a company that provides electrical wiring replacement services.
Drawing up a diagram
The future wiring diagram can be based on standard single-line power supply diagrams, which are freely available on the Internet. The basic rule here is the following. At least two branches must go from the meter to any room in the house - one for the lighting circuit, the second for sockets.

Since a private house, as a rule, has one bathroom, an additional potential equalization system is not required. That is, on the wiring replacement diagram, only branches to connection points (sockets) and stationary electrical installations should be indicated.
One more thing important rule, which is worth remembering when replacing electrical wiring: you do not need to draw branches on the veranda, balcony or loggia on the diagram. This is a gross violation of the rules for installing electrical installations in residential premises. Balconies, verandas and loggias must be powered from sockets located in other rooms.
 It is advisable if the drawn up diagram is approved by electricians and organizations involved in fire safety. Practice shows that it is better not to overload the wiring diagram in a private house with small details such as ceiling lighting, an extension cord for the veranda, etc.
Inspectors are confused by such details, and an overall good plan may not be accepted because of this.
Having a permit certificate for replacing old wiring, as well as a certificate of work performed, will help the owner of a private house value it more expensively in the future during a possible sale.
Cable selection
Selecting the cable cross-section is the most important part of preparing for the installation of electrical wiring. To make a competent selection, a preliminary calculation is necessary: you need to add up the power of the available devices and add to the sum 100 watts for each device used.
Then you should divide the result by 220. If the final figure does not exceed 15, you can use wires with a real cross-section of 1.5 mm square. And for sockets, the optimal cross-section is larger - 2.5 mm square.
As for materials, today the priority for home craftsmen who decide to replace the electrical wiring in their home is copper cables of the VVGng-LS and NYM brands. The former are characterized by an affordable cost, and the latter by an additional insulating shell, as well as ease of cutting.
 Aluminum cables are also not prohibited from being used to replace electrical wiring, but their cross-section must be larger than copper cables.
And the cores of aluminum cables tend to break at bends, that is, they are not very reliable. Paying attention to this, aluminum is not recommended for use inside the house.
It is also worth determining in advance the length of wires and cables needed for replacement. To do this, you need to measure the distance from the panel to the connection point, taking into account all the corners, alcoves and protrusions present in a private house.
Traditionally, all electrical wiring turns are made strictly at an angle of 90 degrees, and this also needs to be kept in mind when taking measurements. The resulting values are added to each other and added to the total by at least another 15%.
There is also a simplified method for calculating the footage of wires and cables - you simply need to multiply the area of a private house by two.
Tools and equipment
In addition to wires and cables, you will have to purchase replacement protective equipment for electrical wiring - residual current devices and circuit breakers. These devices are selected for each group of wires separately.
A sixteen-amp circuit breaker is connected to lighting, a 25-amp circuit breaker is connected to sockets, and a 32-amp circuit breaker is used for high-power household appliances. A separate residual current device (with a current of 63 amperes) should also be installed at the input.
The actual procedure for replacing electrical wiring in a private home can only begin when all sockets, automatic devices and lighting fixtures have been purchased.
When purchasing them, you should be wary of defects and fakes. It would not be superfluous to require a quality certificate for goods.
It is also worth making sure that all the necessary tools are at hand. For example, to replace electrical wiring in a private home you may need:

Here you need to add a set of screwdrivers, which any owner probably has, a level, and a pencil. Other tools may be required.
Removing old lines
First, any master who decides to replace the electrical wiring himself must remove the old lines. To do this, turn off the electricity at the input in the distribution panel.
Then all rooms are cleared of furniture so that nothing interferes with the replacement. Old cables must be completely removed, starting with the junction boxes.
Usually they can be pulled out of the grooves without any problems, but if this does not work, then it is better to leave them in place, well insulated on both sides.

By the way, old grooves can be used for new electrical wiring in a private house if you are generally satisfied with the position of sockets and switches.
If not, you will have to make new grooves according to the approved scheme.
Installation of new wiring
It’s worth noting right away that replacing electrical wiring in a private home should be done with tools with insulated handles. And the master himself must wear rubber gloves.

Usually, replacing old electrical wiring in a house begins with replacing the panel and installing it in a new place (unless, of course, the old one is not satisfactory). In private houses, as a rule, there is no special niche for the shield, so the easiest way is to make it hinged and attach it to dowels.
A place is selected for the shield that will always have easy access. In addition, the owner of a private house must run a VVGng 5*6 cable from the old location of the panel to the new one and connect it.
At the next stage of replacing the electrical wiring, you must perform the following actions:

Replacing outdated or dilapidated electrical wiring in a wooden house follows approximately the same algorithm. But here special attention needs to be paid to fire safety. Therefore, experts advise making open cable routing in a private house made of wood.
However, it can be internal if serious finishing and wall covering is planned in the future. Internal electrical wiring in private wooden premises must be placed inside pipes or metal sleeves.
This allows you not only to protect yourself from the risk of fire, but also from damage when drilling holes.
Checking new lines
When you change the wiring in your house, you will need to check the finished lines. Here you should use a multimeter and an indicator screwdriver. This screwdriver can be used to check the voltage at outlets and other specific electrical points.
A test with a multimeter will allow you to more clearly verify that there is no short circuit in any section of the electrical wiring. If the check did not reveal any problems, it means that the replacement of the wiring in a private house was successful, and you can begin plastering, putty and other finishing operations.
The wiring in the apartment is replaced with your own hands according to a pre-drawn diagram. In a one-room apartment in new buildings and in Khrushchev, experts recommend running one cable to the kitchen with a bathroom and another separately to the living room.
This technology allows you to obtain a power reserve by distributing the total load over two circuits. In the event of a short circuit or open circuit, one line will remain in working condition.

Main reasons for cable replacement
There are several reasons why it is necessary to replace the wiring in a one-room apartment.
The main reason is that the wiring diagram and properties of the electrical cable in a new building are not designed to large number powerful electrical appliances. The aluminum wire overheats and the cable melts, which can lead to a fire.
Do-it-yourself replacement of electrical wiring in Khrushchev-era buildings is carried out due to the expiration of the cable's service life.
The optimal value of this parameter is 20 years. After this period, the insulation is destroyed, the wire sparks, and a short circuit occurs.
Lack of grounding is one of the incentives to update the electrical wiring in your apartment.
The electrical wiring should be replaced completely, up to the panel. At the same time, switches. Partial replacement of electrical wiring is allowed in the event of a wire break in a certain section of the circuit.
Preparatory work
Before changing the wiring in the apartment, you will need to carry out installation work using grooves (grooves in concrete). Wires are connected to sockets and switches under the plaster, in grooves or in the voids of the floors.
An apartment plan is drawn on paper, which indicates the location of household appliances, sockets, switches and lighting fixtures. It is recommended to install sockets in places where powerful electrical appliances are installed.
For an electric stove, a separate socket with a power cable of more than 4 sq.m. is installed. The cross-section of the wire depends on the power of the stove. Sockets are mounted in the apartment wall, taking into account a distance from the floor of 80-100 cm.
Switches in the apartment are installed at the entrance to the room, maintaining a distance of 15 cm from the doorway. Installation work is carried out from the side of the vestibule so that the door opens and closes easily.
For each room of a one-room apartment, the total power of electrical appliances is calculated.
The system cannot be laid diagonally or at an angle other than 90 degrees.
There are three consumer groups:
- sockets;
- lighting;
- powerful household electrical appliances.
A separate power cable is used for each group. The diagram indicates the type and cross-section of the cable. The cost of wiring electricity in an apartment depends on several factors:
- independent cable installation or specialist services;
- choosing a wiring replacement method;
- living space area.
Purchasing material
To lay the cable to the lighting fixtures, use a three-core copper wire VVG (power wire VVGng) with a cross-section of 1.5 sq.m. To calculate the length, you will need to measure all the marks made on the walls and ceiling, adding about 10-15 cm for junction boxes and switches.
Wiring in the apartment (for sockets) is done using a three-core VVGng cable.
Electrical installation work involves the use of automatic circuit breakers and RCDs (a mechanical switching device that is designed to switch on, conduct and switch off currents under normal operating conditions, including opening contacts when the differential current reaches a specified value under certain conditions).
This unit is presented in the form of a residual current device, which is used to protect against leakage currents. The circuit breaker is used for short circuit protection.
For sockets, you will need to buy a 30 mA Class A RCD and a 16-20 A circuit breaker. For lighting fixtures, purchase a 10 A circuit breaker. For the kitchen, you will need a 25 A circuit breaker and a 30 mA RCD.
The electrical panel can be metal or plastic. Its size is selected taking into account the number of machines and RCDs. For a one-room apartment, you can buy a panel with a reserve for 2 machines.

To connect wires and junction boxes, special connecting insulating elements - SZY - are used.
Stages of installing wiring in an apartment
The process of replacing electrical wiring begins with the installation of a new panel. If the studio apartment is located in a new building, then a special niche is provided for this unit, to which the cable is connected. You install automatic devices and RCDs in the niche.
If you are replacing electrical wiring in a Khrushchev-era building, then you select the installation location for the panel yourself. The structure is installed on dowels. A hole is made in the wall and a cable is pulled through. The power wire is connected to the switchboard.
The next stage involves protecting the input cable. The blue wire is connected to zero, the yellow wire to ground, and the white wire to the top contact on the machine. If an RCD is used, then the phase and zero are connected to the RCD, then go to the machine and the zero terminal.
Laying cables along the floor involves dismantling the old floor covering and installing a new finishing floor. For concrete or brick walls, you will need a hammer drill. Places for installing distribution boxes and sockets are cut out with a special crown.
Cable laying in ceiling voids is carried out without violating the integrity of the walls and ceiling. The next step involves cutting the wire into pieces of appropriate length.
To easily replace the required area without disturbing the wall decoration, corrugation is used. To tighten the bundle of wires, use clamps.
To connect the cable in junction boxes, use means personal protection. To check the functionality of the system, you will need a tester (multimeter). It is presented in the form of a measuring tool that allows you to:
- identify damage to electrical appliances;
- check the battery charge;
- measure the operating voltage of electrical appliances.

The grooves are sealed. If the cable is being laid, then it is recommended to hide it in a corrugation. Clips are used to secure the wire to the walls. You can lay electrical wiring in special channels.
The plinth is attached to the floor. From it the box leads to switches and sockets. Then the wires are laid. If necessary, install external distribution boxes.
This technology is used in places where it is not possible to install hidden wiring, including in office and commercial premises.
To replace electrical wiring in a one-room apartment in a new building, you will need the following tools:
- perforator;
- nozzles;
- Bulgarian;
- indicator screwdriver;
- building level;
- spatula.
Electrical wiring in the apartment is replaced in several stages:
- Development of an apartment power supply diagram.
- Drawing up an electrical wiring plan.
- Electrical wiring.
- Installation of switches, automatic machines, RCDs.
The apartment is first de-energized. The distribution board is installed in the place where the machines will be located. The new cable is laid parallel to the old wiring. Sockets and switches are connected to the new cable.
The wiring in the apartment is done sequentially. Initially, connect the sockets and switches of the living room to the new cable, and then the rest of the rooms.
There are basic principles for laying channels that must be observed when carrying out this work:
- minimum channel length;
- the channels must run parallel to the floor, deviations at right angles are allowed;
- if it is planned to install 2 sockets on different sides in one wall, then to save money and time it is recommended to make a hole in the wall. The wire is routed through it.
Sockets and switches are installed after the putty, which is used to seal the grooves, has dried.
If you do not have experience in connecting electrical wiring to the distribution board yourself, it is recommended to seek help from specialists.


