The router signal is weak, what should I do? How to strengthen the Wifi signal on a laptop. Antenna operation
Wi-Fi network performance is problematic in two ways. First: weak and unstable signal. Second: low data transfer speed. Both can be easily solved even by a person with a humanitarian mindset, if he reads our article or offers a box of beer to a neighbor who is an IT specialist.
The option with beer is, of course, better and revitalizes the Russian economy, and also provides a significant increase in GDP. But this option often has an incorrigible drawback: the neighbor IT specialist may not exist. And then, willy-nilly, you will have to read what we wrote for you here.
1
The most important. Make sure that at the center of your Wi-Fi network is a modern, full-fledged wireless router (aka router). The key word is modern. The fact is that communication equipment is developing as actively as the entire IT industry. Those standards, protocols and wireless transmission speeds that were the norm 5-7 years ago are now hopelessly behind. For example, not so long ago a channel of 50-60 Mbit/s was considered a decent option for the home, for the family, for show-offs. And now inexpensive devices for a couple of thousand rubles claim a theoretical 300 Mbit/s.
2
In his personal diaries, Captain Obvious has repeatedly noted that the main obstacle to a Wi-Fi signal is walls and partitions. In addition to walls, any shielding barrier containing metal can become a serious obstacle to the Wi-Fi signal - most often a mirror, an aquarium or a steel statue of Darth Vader. Demolition of all the walls in the apartment is the optimal solution to all your problems, but it is troublesome, yes. It’s easier to think about finding the optimal placement point for the signal source. Your wireless router should be as close to the center of the room as possible and should not lie on the floor, but should be placed at least a meter from the floor.
3
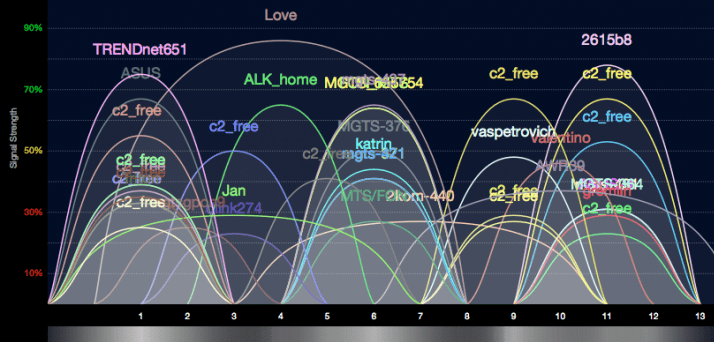
When you started searching for a network, you probably noticed more than once that there were a couple or even a dozen other people’s Wi-Fi signals walking around your apartment. For some reason, few people think about the fact that other people’s networks operate in the same frequency range as yours, and there is nothing good about that. According to standards, 13 frequency channels are allocated for Wi-Fi networks in Russia. We stole a screenshot of the configuration menu from the instructions for the popular ZyXEL Keenetic Lite router - you can see how in the “Network Client” mode the router shows channels occupied by neighbors. There are also separate programs that do the same thing, for example inSSIDer. All you have to do is study the received list, select the freest of 13 channels and set it as the default in the router.
4
Many craftsmen manually pump up router antennas by hanging tins, foil, and so on on them. In fact, the game is clearly not worth the candle - it is better to buy a suitable high-power antenna. There is a considerable assortment of them on Wi-Fi equipment websites, and some look very exotic. Antenna gain is specified in isotropic decibels (dBi). A standard antenna from a home router has a power of around 2 dBi, but finding and buying an antenna with a gain of 10-20 dBi is not a problem, and this radically solves the situation with signal availability! But it also makes sense to tame foil - recently a particularly virtuosic life hack with reflectors from , arousing increased interest, has been invented.
5
Many modern router models are equipped with a pair of antennas, and top models may have even more. Usually this provides a good signal, but if not, then changing two antennas at once will be expensive. In such a situation, it is better to install an additional signal distribution point in the apartment - such devices are called “repeaters” (Wi-Fi repeaters). They cost about the same as an inexpensive router and are easy to set up.
6
Often the problematic element in a home network is not the router, not the apartment layout, but the receiving device itself. You need to get two things off your chest once and for all. First: if you have a powerful computer for games and multimedia, it is still better to connect it to the network via a wired connection (there are a million reasons for this, and all of them are important). Second: if you are going to receive Wi-Fi via an adapter, choose not a tiny device the size of a fingernail (it is only suitable for gatherings in a coffee shop), but a receiver with a large antenna. Buying a Wi-Fi adapter with a heavy antenna also helps when your laptop receives a lousy signal, but in some corner of the room it is much better. You can plug a Wi-Fi adapter into your laptop and place its antenna in that lucky corner.
If something can be done, it can be done easily! Telegram channel MAXIM: Lifehacks
Another the simplest way how to boost the signal of your Wi-Fi router, laptop or computer without spending a penny. The story will be about how to make an attachment for an existing antenna with your own hands, with the help of which you can significantly increase the signal level, and therefore the range and coverage area of the Wi-Fi signal.
What do we need
From materials for the nozzle:- Foam backing - food packaging. You can use any other material or sheet of cardboard.
- Thick copper wire. A short segment.
- Scissors.
- Ballpoint pen or pencil.
- Vernier calipers or regular ruler.
- Wire cutters.

All dimensions are indicated in millimeters. The idea is this: a long piece of foam substrate is mounted on the antenna, into which copper pieces are inserted. This creates the directionality of the antenna and the concentration of the signal in one direction.
Above are the distances between the copper pieces. And below is the length of each copper piece.

I took this pallet, in which dates or greens are often sold.

A piece of thick copper wire 0.8-0.9 mm in diameter. You can try with a thicker one.

We mark the lining with a caliper and put points with a pen where the antenna from the router will be inserted.

Draw the cutout lines.

We cut out the guide with ordinary scissors.

We look at the drawing and decide where and how long the segment will be inserted.

Use wire cutters to cut the wire to the appropriate length.

Insert the wire pieces into the guide. If desired, you can secure them with hot glue so that they do not fly out.

Our amplifier attachment is ready for testing.

Turn on the laptop, run the program scanning the signal reception level. Let's wait a bit to notice the level of initial reception. Then we put the attachment on the Wi-Fi antenna, point it at the router and immediately see an increase in power and signal level.

To check, we remove the attachment from the antenna and immediately see the signal drop to the initial level.

We put it on again and again we see an increase. Everything works great.

I put the attachment on the Wi-Fi adapter module connected to the laptop. If you want to significantly increase the reception distance, then you need to put such an attachment on the antenna of your distribution router. Two Wi-Fi antennas facing each other will work great.
Here's a simple and effective way to make life easier in a few minutes. Now there are no problems with the Internet in my gazebo in the garden, and most importantly, I didn’t have to buy anything. And we all know very well how much expensive antennas or routers for remote points and objects now cost. Until next time.
This is a pressing topic that has begun to emerge in people’s minds more and more often. And for good reason, since there are much more routers that distribute a wireless network and feed people the Internet. Just 10 years ago, no one had heard of such technology, but now every drunk neighbor has this simple box with antennas.
Strengthening the signal level of a router is a common problem in large private houses, when it is necessary that the signal be on all floors and preferably on the street (for CCTV cameras). But even in ordinary apartments this problem arises quite acutely. These are all nasty neighbors who bought themselves routers and are ruining your wireless network.
Let me explain it more simply - the more neighboring routers around you, the more difficult it is for yours to work and distribute Wi-Fi. Because of this, the speed drops, interference may appear, or even the connection may be interrupted. In the article, I will tell you step by step how to strengthen and improve a bad Wi-Fi router signal at home, and I will also tell you why it drops and why. Everything is in simple language.
Changing the location of the router
This point is one of the most important, since a weak WiFi signal from a router can be influenced by many factors. First of all, it is best to place the device as close to the center of the house or apartment as possible.
If this is not possible, then install it in such a way that there are as few walls and obstacles as possible in the path of the wave. Good location in the corridor where all the rooms and the kitchen meet.
Also, along the path of the Wi-Fi signal there should be no mirrors, metal fences or plates that would permanently kill the wave. Move away from the router, radios and microwave ovens that operate at the same frequency. Another tip is not to install it on the floor or ceiling. The router should be positioned approximately centered between the ceiling and floor.
You've probably seen a lot of videos where supposedly amplifiers are installed from beer cans and foil. But in fact, they do not amplify, but simply redirect the signal by reflecting it from a metal surface. They also reflect neighboring waves, which can interfere, although only in the range of this metal device.
Another point is the correct placement of the antennas. They should be at an angle of 90 degrees. This way the waves will spread over a longer distance. If you have three of them, then tilt the two on the sides at an angle of 45 degrees, and set the central one at 90.

Changing the communication channel
So let's first figure out what kind of channels these are. Routers operate in the 2.4 GHz and 5 GHz frequency range. Most routers have a default frequency of 2.4 GHz. This means that all your neighbors use this particular frequency and most likely you have the same frequency in your router. This frequency has 14 channels.
So, if, for example, your router is set to channel 5, and your neighbor is sitting there, then the transmission speed drops, there may be gaps and other problems. Our task is to configure it in offline mode, so that the device itself looks for a free channel and connects to it. To do this, you need to go to the admin panel of the router.
- The IP or standard URL of the router is located on a label under the case. There is also a login and password for the admin panel.
- We connect to the network directly or via Wi-Fi from a phone, laptop or computer, launch the browser and enter the address. Enter the authentication data. The most commonly used addresses are 192.168.1.1 and 192.168.0.1.
- Now we need to go to Wi-Fi settings. Here are the paths for different models:
| Firm | Path | |
| Old models | New models | |
| TP-link | Wireless mode | 1. Additional settings 2. Wireless mode 3. Setting up wireless mode |
| D-link | WiFi | 1. Advanced settings 2. Wi-Fi 3. Basic settings |
| ZyXEL Keenetic | Ladder icon at the very bottom (Wi-Fi network) | Wireless mode |
| Asus | Wireless network | 1. Advanced Setting 2. Wireless |
| Rostelecom Sagemcom f@st 2804 and 3804 | 1. WLAN setup 2. Additional information |
|
- You need to set the country, if there is such a field. This is necessary so that the router understands which communication channels, mobile operators and television are used in your region.
- Set channel detection to “Auto” mode.
- Save the settings and reboot the router.
Find out a free channel
If this does not help, then most likely the router was unable to select the optimal channel itself. It's okay, we'll do it for him.
- Download the Acrylic program - https://www.acrylicwifi.com/ru/.
- Go to the download section and download the Home version.
- We install.
- After launch, you will see lines with different networks of your neighbors. You need to see who is sitting in the same channel as you. If so, then simply select a free channel. Please note that the majority are on channel 1, two are on channel 11, and only 2 of them use an unoccupied channel - 3 and 5. In my case, I will simply move from channel 1, for example, to 7 or better yet to 13 - since it is last and rarely used.

Change the standard to N or AC
Modern Wi-Fi routers work with several IEEE 802.11 standards - this is one of the most common radio communication standards. It has varieties. Modern devices that distribute the Internet and network work with the following standards:
- IEEE 802.11b– the radius in the house is up to 38 meters, in open areas it can be up to 138 meters. Speed up to 10 Mbit per second.
- IEEE 802.11g– the speed is already higher – 54 Mbit per second, the radius is approximately the same as that of b.
- IEEE 802.11n- this is a steeper standard with a radius of 65 meters in a house or apartment, and up to 240 meters on the street. The speed is generally colossal - up to 600 Mbit per second.
- IEEE 802.11ac- this is simply a titanium of waves, has a colossal radius of up to 110 meters inside and up to 380 meters outside. Speed up to 6 Gbps.
If you look at the characteristics of routers that were released 5 years ago, they mainly support b, g, n. Modern machines can operate in the "ac" range. After reading the specifications, we can assume that we will try to switch our router to IEEE 802.11n mode, and, if possible, IEEE 802.11ac.
This is done in the same section as in the last chapter. Let me remind you that “ac” will work with 5 GHz, and “n” with 2.4. We set these values. Please note that you need to install IEEE 802.11n, and IEEE 802.11b/g/n. Next, save the settings and reboot.
NOTE! Old phones and laptops may not support this standard and will stop connecting, so you may need to purchase another external module for the laptop or set the standard range to the old one.
Buying a more powerful router
What needs to be taken into account here is the support for the standards that I mentioned above. For example, old routers only work in the IEEE 802.11b/g/n range, but the problem arises precisely in the configuration. For example, a friend of mine has support for IEEE 802.11b/g/n, but he was unable to switch only to the N standard, and then it turned out that this was impossible.

If you buy a modern router, it will most likely have a newer standard that has higher bandwidth and range. I recommend taking a dual-band one with support for 2.4 and 5 GHz, and of course the IEEE 802.11ac standard. The price for them has fallen over the past 5 years and you can get an excellent device for 5,000 rubles. I don’t recommend taking a very cheap one, as they will overheat and freeze due to weak hardware.
Setting the signal strength
There, in the settings, you can increase the power of the hardware transmission. It can be specified as a percentage. If it is not 100%, then convert the value to one hundred. This is also an excellent opportunity to specifically reduce the signal so that the router only works in the range of one apartment. This way, your neighbors won’t be able to hack you, because they simply won’t get you.
Repeater installation
This is a device that is installed at the very end of the Wi-Fi network range. In this case, the wave must fully reach this place. A repeater or signal repeater simply catches the wave and amplifies it. For example, you have a router on the first floor of your house. You place a repeater near the stairs of the second floor, and it distributes the same network to the second. A great way and a good option.

They are also called repeaters. They have from 1 to 3 antennas and are plugged into an outlet. They cost from 1000 to 4000 rubles. Be sure to make sure that it supports the same standards as your main router before purchasing. A second router can also act as a signal repeater. So if you have an extra device lying around, you can configure it as a repeater. This is done there in the settings. Just search for the item name "Mode".
Antenna change
In theory, installing a more powerful antenna should increase the network coverage radius, but in reality I have not tested this myself. Standard antennas are set at 2-3 dB. If you have a large apartment, then 7dB will be enough. For big house You can take a 14 dB antenna or make it yourself. In stores, such antennas cost from 1000 to 8000 rubles, depending on the signal amplification power. For a large village, you can add up and buy one antenna with a 30dB radius that will be huge.
NOTE! Routers without an antenna or with an internal transmitter work much worse than antenna ones.

Which is better to choose 5GHz or 2.4GHz
This is a difficult question, as these two standards have their pros and cons. Let me remind you that the IEEE 802.11ac standard, which has the most large radius It works exactly at 5 GHz. But as we remember from physics, the higher the frequency, the more difficult it is to pass through various obstacles and the faster it fades.
2.4 GHz has a higher range and does not decay as quickly, so in a large house it is better to use 2.4. But at 5 GHz, due to the high frequency, the data transfer speed is much higher. For example, for gamers, it is better to use 5 GHz, but the laptop or computer should not be far from the router. Since the signal is strongly suppressed by walls, doors and other obstacles. Less ping, higher speed.

Also, 5 GHz has a big advantage - most neighboring modems operate at 2.4. This means that 5 GHz channels are freer, cleaner and more stable. Sometimes changing the frequency greatly improves communication and Internet speed. But you need to understand that not all old phones, TVs, and repeaters will be able to operate at the 5 GHz frequency. Let me give you a few options for different situations:
- 1 – 2 room apartment – 5 GHz
- 3 room apartment – 2.4-5 GHz
- Large House - 2.4 GHz or 5 GHz with 2 repeaters.
How to strengthen signal reception?
If the signal on the laptop is weak, but on other devices it is quite normal, then most likely the problem is in the adapter of the laptop. To do this, you can purchase an external Wi-Fi module with an antenna. It will pick up the signal much cleaner. This thing is also suitable for computers that do not have a built-in Wi-Fi module at all.

Video instructions
The question is of course fair and the answer will also be unexpected - two routers are not needed for most users.
However, if you look at a situation like this, the picture of utility changes.
For example, in a large apartment you want to avoid numerous wires. Or you have a lot (two, three) TVs and you don’t want to get an Internet cable for everyone.
Then you will see that the standard Wi-Fi range is not enough.
What then?
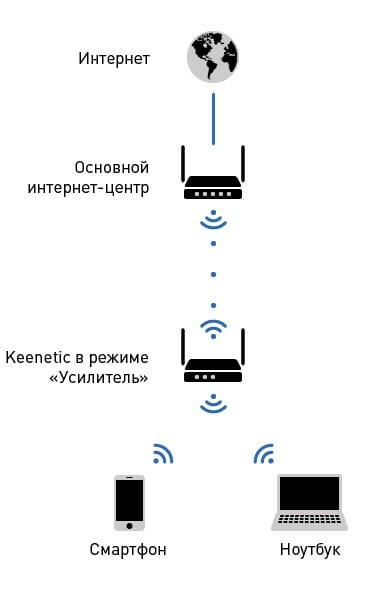
Then combining two routers via Wi-Fi
In this option we don't need any cables, so I think it's more attractive.
And the result will be wonderful. Because we still have a single network, but with the addition of one more access point.
And the main thing is that Wi-Fi coverage area increases without loss of quality.
The only requirement for such a connection is that the second router acts as a repeater for the main signal. If I’m not mistaken in the names, this function is called repeater mode, and today most routers have WDS technology.
Settings for a bunch of routers.
We do not change anything in the main router, all parameters remain the same. You need to check the channel number in the Wireless section (Chanel line).
We check the same thing in the second router, otherwise they will not start working together. Now the main task is to configure the second device to signal relay mode. Make sure the second router supports WDS technology.
This can be checked in the documents or on the manufacturer's website. Then connect it to your computer and go to settings through your browser.
Here we make the following changes:
In the WPS section, disable the active status and reboot the router.
It is recommended to go to the DHCP section and disable the server of the same name, since the function of the repeater is to receive network data and not distribute it.
Select the Network section and change the last number in the IP address (you can increase it by one) so that it does not coincide with the combination specified in the operating data of the main router. After the reboot, enter a new set of numbers to enter the parameters.
Open Wireless:
1. Change the Network Name - come up with a name for the access point so that you know which device you are connecting to.
2. Go to Chanel and select the same number as in the basic Internet settings.
3. Check the box next to Enable WDS Bridging - this will enable the operating mode as a repeater.
4. Now that work has begun in the new mode, new settings will appear - click on Survey to search for the network to which we will connect.
5. From the search results, select the main access point, click Connect. In the window that appears, all that remains is to set the encryption type (Key Type) and enter a password for logging into the Internet.
After installing a second access point, you will significantly increase your Wi-Fi coverage area without losing speed and connection quality.
And this is what we need!
So beat it, in one touch about the cable connection.
There are two types of connection using a LAN cable - LAN-WAN or LAN-LAN
Here, equipment for accessing the Internet is located in one network segment. To establish a LAN-to-LAN connection in the main device, all data remains as default.
And in the LAN-WAN process, one of the routers becomes the main one and it receives the Internet. And the second router plays the role of a secondary network and receives data from the “main” access point.
There are relatively many settings:
Enter your IP address in your browser and you will see your device settings.
In the LAN section there should be a checkmark next to the DHCP server.
In the WAN section, the connection type is set to Dynamic IP. And so on…
That’s why I don’t consider it any more than we settled on a Wi-Fi connection. So two routers are not an unnecessary luxury!
Tiny bonus in the topic:
Did you know that the modem mode in modern phones allows you to “distribute” the Internet connection to other mobile devices using both a wireless connection and a USB connection. No, .
Good luck, Friends!
A weak WiFi signal is a pressing problem for residents of apartments, country houses and office workers. Dead zones in a WiFi network are typical for both large rooms and small apartments, the area of which even a budget access point can theoretically cover.
The range of a WiFi router is a characteristic that manufacturers cannot clearly indicate on the box: the WiFi range is influenced by many factors that depend not only on the technical specifications of the device.
This material presents 10 practical advice, which will help eliminate the physical causes of poor coverage and optimize the range of the WiFi router, this is easy to do with your own hands.
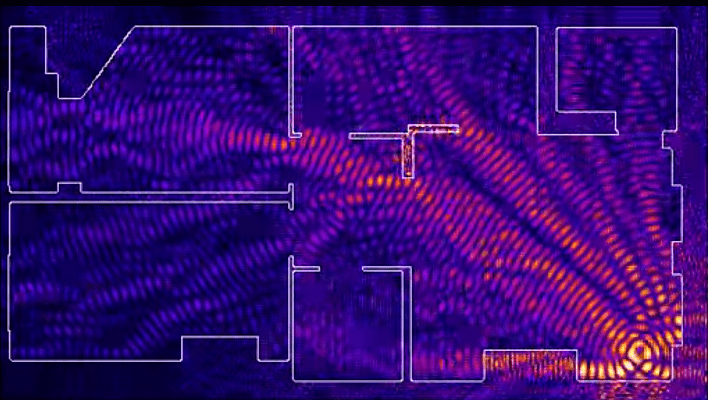
The radiation from the access point in space is not a sphere, but a toroidal field, shaped like a donut. In order for WiFi coverage within one floor to be optimal, radio waves must propagate in a horizontal plane - parallel to the floor. For this purpose, it is possible to tilt the antennas.

The antenna is a donut axis. The angle of signal propagation depends on its inclination.

When the antenna is tilted relative to the horizon, part of the radiation is directed outside the room: dead zones are formed under the “donut” plane.

A vertically mounted antenna radiates in a horizontal plane: maximum coverage is achieved indoors.
In practice: Mounting the antenna vertically is the easiest way to optimize indoor WiFi coverage.
Place the router closer to the center of the room
Another reason for the occurrence of dead zones is the poor location of the access point. The antenna emits radio waves in all directions. In this case, the radiation intensity is maximum near the router and decreases as it approaches the edge of the coverage area. If you install an access point in the center of the house, the signal will be distributed throughout the rooms more efficiently.
A router installed in a corner transmits some of the power outside the house, and distant rooms are at the edge of the coverage area.

Installation in the center of the house allows you to achieve uniform signal distribution in all rooms and minimize dead zones.
In practice: Installing an access point in the “center” of the house is not always feasible due to the complex layout, lack of sockets in the right place, or the need to lay a cable.
Provide direct visibility between the router and clients
WiFi signal frequency is 2.4 GHz. These are decimeter radio waves that do not bend well around obstacles and have low penetrating ability. Therefore, the range and stability of the signal directly depend on the number and structure of obstacles between the access point and clients.

Passing through a wall or ceiling, electromagnetic wave loses some energy.
The amount of signal attenuation depends on the material the radio waves travel through.


*Effective distance is a value that determines how the radius of a wireless network changes in comparison with open space when a wave passes an obstacle.
Calculation example: WiFi 802.11n signal propagates under line-of-sight conditions over 400 meters. After overcoming the non-permanent wall between the rooms, the signal strength decreases to 400 m * 15% = 60 m. The second wall of the same type will make the signal even weaker: 60 m * 15% = 9 m. The third wall makes signal reception almost impossible: 9 m * 15 % = 1.35 m.
Such calculations will help calculate dead zones that arise due to the absorption of radio waves by walls.
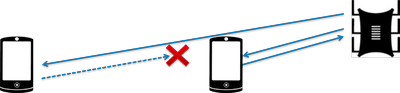
The next problem in the path of radio waves: mirrors and metal structures. Unlike walls, they do not weaken, but reflect the signal, scattering it in arbitrary directions.
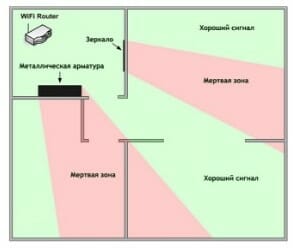
Mirrors and metal structures reflect and scatter the signal, creating dead zones behind them.

If you move interior elements that reflect the signal, you can eliminate dead spots.
In practice: It is extremely rare to achieve ideal conditions when all gadgets are in direct line of sight to the router. Therefore, in a real home, you will have to work separately to eliminate each dead zone:
- find out what interferes with the signal (absorption or reflection);
- think about where to move the router (or piece of furniture).
Place the router away from sources of interference
The 2.4 GHz band does not require licensing and is therefore used for the operation of household radio standards: WiFi and Bluetooth. Despite the low bandwidth, Bluetooth can still interfere with the router.

Green areas - stream from the WiFi router. Red dots are Bluetooth data. The proximity of two radio standards in the same range causes interference, reducing the range of the wireless network.
The magnetron emits in the same frequency range microwave oven. The radiation intensity of this device is so high that even through the protective screen of the furnace, the radiation from the magnetron can “illuminate” the radio beam of the WiFi router.
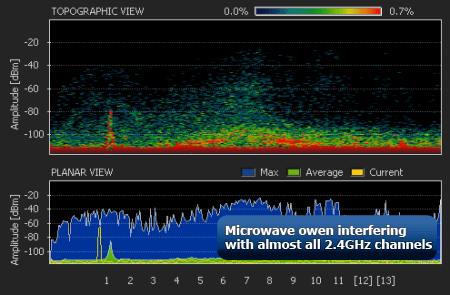
Microwave oven magnetron radiation causes interference on almost all WiFi channels.
In practice:
- When using Bluetooth accessories near the router, enable the AFH parameter in the settings of the latter.
- The microwave is a powerful source of interference, but it is not used very often. Therefore, if it is not possible to move the router, then you simply won’t be able to make a Skype call while preparing breakfast.
Disable support for 802.11 B/G modes
WiFi devices of three specifications operate in the 2.4 GHz band: 802.11 b/g/n. N is the newest standard and provides greater speed and range compared to B and G.

The 802.11n (2.4 GHz) specification provides greater range than legacy B and G standards.
802.11n routers support previous WiFi standards, but the mechanics of backward compatibility are such that when a B/G device appears within the N-router's coverage area - for example, an old phone or a neighbor's router - the entire network is switched to B/G mode. Physically, the modulation algorithm changes, which leads to a drop in the speed and range of the router.
In practice: Switching the router to “pure 802.11n” mode will definitely have a positive effect on the quality of coverage and throughput of the wireless network.
However, B/G devices will not be able to connect via WiFi. If it is a laptop or TV, they can be easily connected to the router via Ethernet.
Select the optimal WiFi channel in the settings
Almost every apartment today has a WiFi router, so the density of networks in the city is very high. Signals from neighboring access points overlap each other, draining energy from the radio path and greatly reducing its efficiency.

Neighboring networks operating at the same frequency create mutual interference, like ripples on the water.
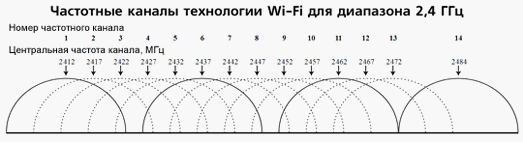
Wireless networks operate within a range on different channels. There are 13 such channels (in Russia) and the router switches between them automatically.
To minimize interference, you need to understand which channels neighboring networks operate on and switch to a less loaded one.
Detailed instructions on channel setup is presented.
In practice: Selecting the least loaded channel - effective way expand the coverage area relevant for residents of an apartment building.
But in some cases there are so many networks on the air that not a single channel provides a noticeable increase in WiFi speed and range. Then it makes sense to turn to method No. 2 and place the router away from the walls bordering neighboring apartments. If this does not bring results, then you should think about switching to the 5 GHz band (method No. 10).
Adjust the router transmitter power
The power of the transmitter determines the energy of the radio path and directly affects the range of the access point: the more powerful the beam, the further it hits. But this principle is useless in the case of omnidirectional antennas of household routers: in wireless transmission, two-way data exchange occurs and not only clients must “hear” the router, but also vice versa.
Asymmetry: the router “reaches” to mobile device in the back room, but does not receive a response from him due to the low power of the smartphone’s WiFi module. The connection is not established.
In practice: The recommended transmitter power value is 75%. It should be increased only in extreme cases: turning the power up to 100% not only does not improve the quality of the signal in distant rooms, but even worsens the stability of reception near the router, since its powerful radio stream “clogs” the weak response signal from the smartphone.
Replace the standard antenna with a more powerful one
Most routers are equipped with standard antennas with a gain of 2 - 3 dBi. The antenna is a passive element of the radio system and is not capable of increasing the flow power. However, increasing the gain allows you to refocus the radio signal by changing the radiation pattern.

The higher the antenna gain, the further the radio signal travels. In this case, the narrower flow becomes similar not to a “donut”, but to a flat disk.

There is a large selection of antennas for routers with a universal SMA connector on the market.


In practice: Using an antenna with high gain is an effective way to expand the coverage area, because simultaneously with the signal amplification, the sensitivity of the antenna increases, which means the router begins to “hear” remote devices. But due to the narrowing of the radio beam from the antenna, dead zones appear near the floor and ceiling.
Use signal repeaters
In rooms with complex layouts and multi-storey buildings It is effective to use repeaters - devices that repeat the signal from the main router.


The simplest solution is to use an old router as a repeater. The disadvantage of this scheme is that the throughput of the child network is half as much, since along with client data, the WDS access point aggregates the upstream flow from the upstream router.
Detailed instructions for setting up a WDS bridge are provided.
Specialized repeaters do not have the problem of reducing bandwidth and are equipped with additional functionality. For example, some Asus repeater models support the roaming function.

In practice: No matter how complex the layout, repeaters will help you deploy a WiFi network. But any repeater is a source of interference interference. When there is free air, repeaters do their job well, but with a high density of neighboring networks, the use of repeater equipment in the 2.4 GHz band is impractical.
Use 5 GHz band
Budget WiFi devices operate on the 2.4 GHz frequency, so the 5 GHz band is relatively free and has little interference.

5 GHz is a promising range. Works with gigabit streams and has increased capacity compared to 2.4 GHz.
In practice: “Moving” to a new frequency is a radical option, requiring the purchase of an expensive dual-band router and imposing restrictions on client devices: only the latest models of gadgets work in the 5 GHz band.
The problem with WiFi signal quality is not always related to the actual range of the access point, and its solution is general outline comes down to two scenarios:
- In a country house, most often it is necessary to cover an area in free air conditions that exceeds the effective range of the router.
- For a city apartment, the range of a router is usually sufficient, but the main difficulty is eliminating dead zones and interference.
The methods presented in this material will help you identify the causes of poor reception and optimize your wireless network without resorting to replacing the router or the services of paid specialists.
Found a typo? Select the text and press Ctrl + Enter


